BMW DIS Installation / GT1 installation instructions
By shoulders
I have installed GT1 V39 on my PC using VMware workstation (newest ver). I decided to do this because I knew SCO UNIX would install with no hardware compatibility problems or at least I could get drivers. The other advantages are that I did not need another PC and I did not need to burn loads of CDs.
Where necessary I will put extra bits in for PC users, there also will be parts just for VMware. I suggest for noobies that you install on VMware because it will just work and is easy.
What you need before you start:
- VMware workstation (latest ver)
- GT1 install disk V1.1 (or image)
- GT1 V39 Base CD (or image)
- DIS V39 Program Disk
- TIS and CIP (only if you want to install them)(or image)
- V36 Boot image (supplied)
- Daemon Tools for mounting CD’s (if not ISO).
- Ultra ISO
- Nero Burning Rom
- V19 Boot disks ( These are brilliant)
- Custom floppy with shadow file on (supplied).
- Rawwrite to write custom floppy
Set up your:
VMware machine
- Do a custom setup, new workstation, other operating system and select other (version).
- Name the Virtual machine name ‘GT1 V39’
- 1 processor
- 256 MB RAM
- Bridged networking
- leave SCSI on Bus logic
- create a new virtual disk, IDE, with a 20 GB capacity, rename the VMDK on the next page ‘GT1 V39’
- click finish
- lastly start the VMware PC and set the floppy disk to 2.88MB (might be useful later. Turn pc off
Laptop
All settings unless mentioned should be left alone. That is the hardware setup for VMware users.
The specs for the GT1 are 256MB RAM, 20GB IDE (primary master), CD-ROM (secondary master).
For those of you who already have a laptop it won’t hurt trying these steps but there might be hardware problems, i.e. lack of drivers. I am not an expert on UNIX but if you want to add extra IDE of VGA drivers in you need to use the ‘link’ command at the boot prompt ‘boot:’
Type ‘link’, it will then prompt you for which package you want to install. Normally say you were adding in the update WD IDE driver you would type ‘wd’, UNIX would then prompt you when necessary for the BTLD disk with the files on it.
Another way is at the boot prompt to type a new boot definition string.
defbootstr link=’wd’
This I found doesn’t always work (maybe it is me)
The last thing to note is that when booting of a CD-ROM like in PCs it shoves the FDD to the place of the second floppy, where this is the case the default device will no longer load the BTLD files so you need to tell the UNIX boot where the file are.
defbootstr link=fd(65)wd
defbootstr – define a new boot string, link – link a new driver etc, fd(65) – fd =floppy disk and the (65) is the minor number for the second floppy disk, all disks in SCO unix have these numbers. And lastly wd is the package to be installed
Because I haven’t been working on laptops I will assume the hardware is correct.
GT1 V39 software installation
Images and iso’s are quicker, that is what I am using, obviously for laptop users translate that in to real disk and CD-ROMs.
- load the GT1 V1.1 install CD in to the CD-ROM
- start the pc, boot of the CD-ROM. (press esc in VMware for boot menu)
This will set up all necessary partitions.
- When it says ‘Please insert CD “GT1 Base”, switch off the computer. Just turn the PC off. You would be able to just put V36 base disk in, boot of it and it would install, but we want version V39.
- Create an image of the V39 GT1 Base CD on your desktop.
- open it with ultra ISO
- load the supplied Boot image (bootable/load image) and save the updated image.
- Burn the CD (or not if you are using images)
- load the CD in to the PC and boot of the base CD-ROM.
- Press enter at the boot: prompt
This will now copy all files to your Hard drive. When it is finished it will say ‘system halted’. Then remove the CD.
- Take a snapshot with VMware (just in case of any problems)
- Now restart the PC and boot of the V19 Boot disk, press enter at the boot: prompt and insert the V19 root disk when asked. If of course you need to add in extra drivers link them in at the boot: prompt. (VMware users do not need any extra drivers).
- prepare the custom floppy if you are not using VMware, this is done by using Rawwrite. Instructions are obvious.
- now we are at the unix prompt. This is because we need direct access to the hard drive to alter the root account so we can use this software and remove drivers and problematic pieces of software. Put the ‘custom disk’ in the floppy drive.
- Type each following line exactly including a ‘return’ at the end of each one.
mkdir /fdd
mount /dev/fd0135ds18 /fdd
mount /dev/hd0root /mnt
cp /fdd/shadow /mnt/var/opt/K/SCO/Unix/5*/etc
- now you need to select which boot file you want. Two things to consider. One is the mouse fix for VMware so you can use a PS/2 mouse and the other is if you want easy access to the ‘boot:’ prompt for ‘defbootstr’ arguments or do you want auto boot. You just need to copy the file that you want.
cp /fdd/boot /mnt/var/opt/K/SCO/Unix/5*/etc/default (autoboot with mouse fix) recommended for VMware
cp /fdd/prompt/boot /mnt/var/opt/K/SCO/Unix/5*/etc/default (prompt with mouse fix)
cp /fdd/nomouse/boot /mnt/var/opt/K/SCO/Unix/5*/etc/default (prompt no mouse fix) recommended for laptop installs.
- now type: umountall
- Take a VMware snapshot.
NB: instead of copying the shadow file it is better to either know the password or use the vi editor. Please see the included instructions.
Accessing scoadmin
Method 1
- reset the computer.
- if on VMware, GT1 boots straight through, GT1 automatically recognises the video card and autoboots into the touch screen calibration page. Obviously the is no good.
- So press ctrl + alt + F1 this will bring up a UNIX console. Press enter to make sure you get the hash on the prompt line.
- login. Username: root password: password
- press enter again
- type scoadmin , this gets you into the hardware and system admin program.
- Now go to the setting up scoadmin section.
Method 2
- just after the boot prompt has appeared press enter a couple of times.
- an option should then appear asking you to enter the root password for single user access or press ctrl+d, type in password. This is the root password.
- press enter once and make sure you have the hash on the prompt line.
- now go to the setting up scoadmin section.
NB: on my VMware install at the ctrl+d point the system runs very slow, if yours does this do not be impatient it will get there, I am not sure what is causing this yet on my system, it might be different on a laptop. I suspect a driver of some description.
Setting up scoadmin
- got to hardware/kernel manager
- select bitpad/graphic input device
- select remove bitpad from the system
- remove item 1 (there should only be one) Hampshire TSHARC12 Touch screen 1.0
- remove drivers from kernel.
- remove the drivers from the /dev directory
- create new kernel
- select yes to ‘do you wish to boot this kernel by default?’
- rebuild the kernel environment
- when done press enter and select q to quit back to the hardware/kernel manager.
- TAB over to tune parameters.
- press enter
- select option 1
- press enter until the BDFLUSHR appears and enter a value of 30 and then press enter.
- you should end back up at the tune parameters screen.
- press q to quit to the hardware/kernel screen
- update the system configuration files with your changes
- press enter to continue
- relink the kernel
- yes to ‘do you want this kernel to boot by default’
- rebuild kernel environment
- press enter to come back to hardware/kernel manager
- select mouse/graphic input
- remove any mouse present
- select add mouse
- add a PS/2 low resolution mouse (VMware users must have the mouse fix unless you use a com mouse after install a com port in VMware)
- after you have selected your mouse and a message comes up asking about consoles just press enter
- select no when asked ‘do you want to use the PS/2 mouse on any other terminals.
- select yes to ‘you must create a new kernel to effect the driver change you specified. Do you wish to create a new kernel now?’
- select yes to ‘do you wish to boot this kernel by default?’
- yes to rebuild the kernel environment
if the mouse doesn’t work try completely removing the mouse and the driver from the kernel and trying from step 23. Also try associating with tty1a and tty2a.
- when that is done, press enter and then q to quit back to the kernel/hardware manager.
- Exit the kernel hardware manger
- select video configuration manager
- If your video card is already recognised, make sure it is 256 colours and 1024X768. select modify and then ok. If it is not recognised select it from the list. If you have driver on a disk, select add adapter.
- go to software manager
- remove ‘Hampshire TSHARC12 Touch Screen Driver’. This removes the calibration screen.
- select yes to remove /usr/tsharc12/cal (if prompted)
- select yes to boot this kernel by default
- rebuild the kernel environment
- press enter
- select OK
- exit software manager
- select networks
- select network configuration manager
- remove all the network cards except ‘HW SCO TCP/IP Loopback driver’
they all have the same setting of hostname=gt1ap , ip=192.168.68.30, broadcast address=192.168.68.255, subnet=255.255.255.0
- ADD in your network driver (LAN). If using VMware the card is automatically detected when you select add. (AMD PCNet-PCI).
If you are using a laptop the network card if it is supported should automatically be detected. If not find drivers for it.(SCO has a list of compatible hardware on their site) and I assume use configure hardware not on this list. Feed back would be good about this.
- select continue
- select SCO TCP/IP
- Type in an IP of your choosing, make sure it is on your subnet (network), it will then fill in everything else for you.
- select ok
- select ok
- exit the network configuration manager
- re link the kernel
- boot of this kernel by default(y)
- rebuild the kernel environment(y)
- press enter to return to the scoadmin.
- go to file exit to the prompt
- take a VMware snapshot
- the software and hardware are now set up. Type init 6 to restart the PC.
Setting up DIS (GT1 Ver)
The GT1 software should now autoboot and you should see this screen.
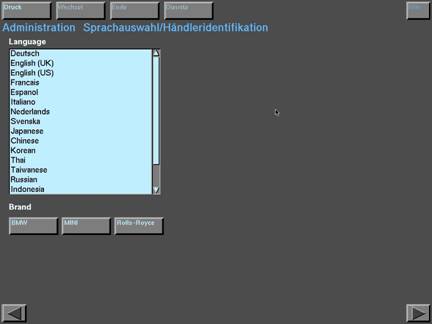
This bit is fairly obvious, select your country, and then your brand of car. Once that is done click on the arrow in the bottom right.
This screen will now come up

These details once entered cannot be changed so make sure they are right. Make a note of the dealer number you use, it will serve as a password later when installing software. I use 12345 nice and easy to remember.
Once you are happy select end and then quit, confirm this choice. A black screen will now appear.
Be patient, the DIS like magic will now appear. See below.
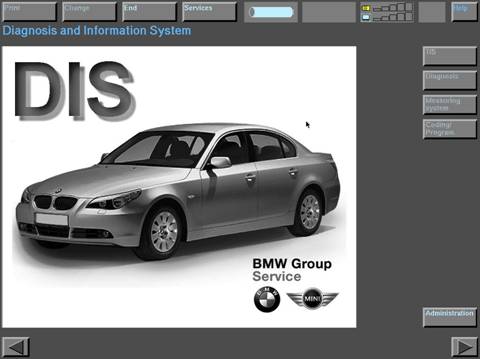
To install the DIS program, TIS and CIP you must go to the administration screen.
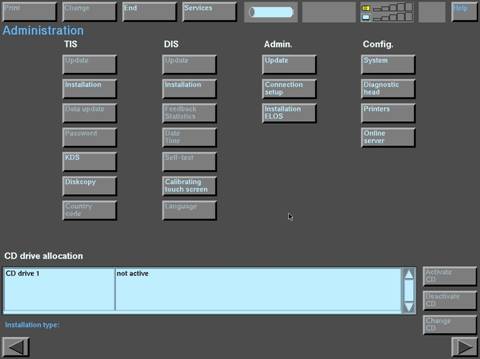
1. Place the DIS CD in the CD-ROM
2. click on cd drive 1
3. click on activate
you should now see in the CD drive allocation box the DIS program CD has been recognised. It seems to take a while in VMware.
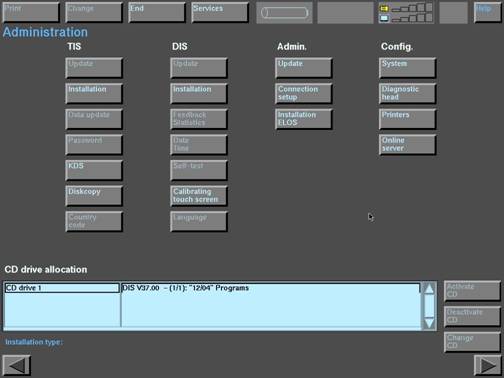
Once the CD is activated, select Installation under DIS and enter the password. 12345 (dealer ID)
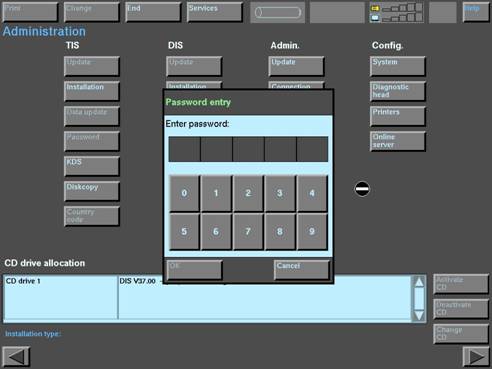
Once the password is entered you should see this screen with the XXX moving like a windows bar. 
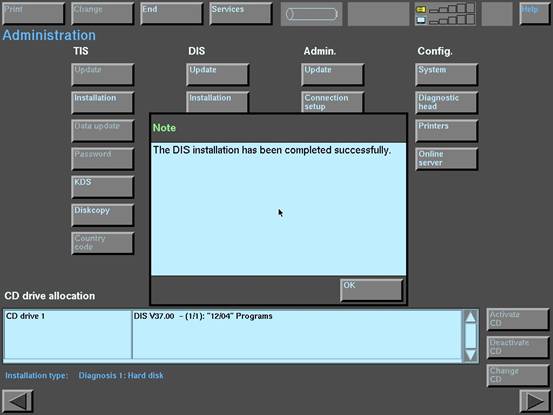
DIS should now install in about 20 minutes.
TIS and CIP should install in a similar manor, KDS is on the TIS CD.
ENJOY
By SHOULDERS (29-may-2006)
Comment or improvements welcome via www.openbmw.org yahoo group.
Thanks to all those who helped me.
NB
1. this will work on V39 disk, I have not tried it on any newer ones. Give it a go.
2. I have not tried the mouse trick see extra document for using a PS/2 mouse in VMware.
3. If the V19 disks don’t work try the V39.
4. I have included the new WD (ide drivers), the link is ‘wd’ ie link=wd or link=fd(65)wd
5. I have included the VGA fix from SCO,(oss653a.)instruction in the docs.
6. I have also included SCO VMware mouse driver, not messed with it though.
7. you can rawwrite single files with rawwrite to read in UNIX (i.e. oss653a.)
8. you can exit the touch screen calibration page by pressing the windows key. Good old Microsoft.